Angel Food Cupcakes | Spring

IMG_9602

The past few months for my have flown right buy in a flurry of school, changes and revelations. My parents finally agreed to let me wear contacts , I’m getting my braces off in a matter of weeks, and I’ve stopped procrastinating so much. While that is great, I’ve also had a revelation about going off to college. Initially, college seemed amazing to me, to be able to start over new, by yourself in a different environment, and meeting new people. But the more I thought about it, what I loved about college suddenly started to be the very thing that also frightened me about college. I would be miles away from my family, friends, or anything that was even vaguely familiar. Is it odd that I wish I was my geeky little freshman self again, so that I would still be ages away from going to college? As great as it is to try new things (something that food has definitely taught me), the overly sentimental part of me still wants to cling on to the small world I live in right now. 

get-attachment (2)

But I do want a fresh new start, just like spring, and these cupcakes. The seasons and my thoughts definitely inspired me to find and make these cupcakes, and I think they’re the perfect spring snack. Spring reminds me of light, bright, and fruity tastes, and these cupcakes have all of those flavors. The light and fluffy angel food cupcakes are topped with whipped cream and a couple of strawberries and raspberries.

Angel Food Cupcakes w/ Whipped Cream  & Berries

Recipe Adapted from Alton Brown

4 dozen cupcakes

  • 1 1/2 cups sugar (or castor’s sugar)
  • 1/4 teaspoon salt
  • 1 cup cake flour, sifted (if you don’t have cake flour, you can make some! 
  • 12 egg whites (the closer to room temperature the better)
  • 1/3 cup warm water
  • 1 vanilla extract
  • 1 1/2 teaspoons cream of tartar
  • Whipped cream
  • strawberries & raspberries (any sort of berry you want, those two are just the ones I prefer)
  1. Preheat oven to 350 degrees F.
  2. If you have regular sugar: Blend the sugar for about 2 minutes until it is superfine. if you have castors sugar, you can skip this step
  3. Sift half of the sugar with the salt the cake flour in a medium bowl and set the remaining sugar aside.
  4. In a large bowl, use a  whisk to thoroughly combine egg whites, water, orange extract, and cream of tartar for two minutes. Then, using a hand blender, slowly sift the reserved sugar into the eggs beating continuously at medium speed to achieve medium peaks
  5. Once the eggs are whipped to medium peaks, sift the flour over the mixture, 1/4 a cup at a time. Repeat until all of the flour mixture is finished.
  6. Carefully spoon mixture into an lined cupcake tray and fill 3/4 of the way up. Bake until the tops of the cupcakes are turning slightly golden, and you can insert a tooth pick between the liner and the cake and have it come out clean.
  7. Cool completely & top with whipped cream and berries to your liking :)

Happy spring & I hope you all enjoy :)

Deepshikha

Spelling | Banana Bread

I’ve always had issues spelling banana.

It’s just the fact that I never quite remember when I need  to stop with the na’s.

It’s also the reason I lost my second grade spelling bee, which was really quite embarrassing .

But the good thing was, that my embarrassment eventually made me want learn from my mistake, and I finally taught myself how to spell bananas through a song, which I still sing to this day whenever I need to spell bananas.

Heck, I still sing it when I even hear the word bananas, and it was what I stood around singing while mixing the batter for this banana bread.

In my family banana bread is something that everyone loves.

However it’s very rare that you will ever find a piece in my house, because its consumed

within two days of baking it, and we just love it.

My only qualm with it: its very dense and heavy, which i hated for a while. Until I found this recipe.

This particular recipe is lighter than most banana breads which I absolutely love. It still has a good amount of density in it, so its not very fluffy and cake like, essentially hitting an equilibrium in terms of bread density.

The recipe:

Banana Bread:

adapted from food network

  • 2 cups all-purpose flour
  • 1 1/2 teaspoons baking soda
  • 1/2 teaspoon salt
  • 4 overripe bananas
  • 3/4 cup sugar
  • 3/4 cup (1 1/2 sticks) unsalted butter, melted and cooled
  • 2 large eggs
  • 1 teaspoon pure vanilla extract
  • 1/2 cup walnuts broken into small pieces ( not too small or you won’t be able to taste it, but if you make the chunks too big, you will have trouble cutting the bread into proper pieces later) can also be substituted with other nuts i.e. pecans, or if you don’t want nuts they can be removed or replaced with chocolate or butterscotch chips.
  1. Preheat oven to 350 degrees F
  2. In a medium size bowl, combine the flour, baking soda, and salt; set aside.
  3. Mash 2 of the bananas with a fork in a small bowl, and leave them off to the side.
  4.  With an electric mixer fitted with a wire whisk, whip the remaining bananas and sugar together for three minutes to make a fluffy/light mixture (in a medium sized bowl)
  5.  Add the melted butter, eggs, and vanilla; beat well and scrape down the sides of the bowl.
  6. Mix in the dry ingredients.(don’t over blend!)
  7. Fold in the nuts and the mashed bananas that were set off to the side before with a rubber spatula.
  8. Pour into a greased and lined baking pan, and bake for approx. an hour, make sure to check with a tooth pick(insert a tooth pick into the center and see if it comes out clean).
Note: the bread will develop a crack down the middle, which supposed to happen :)

Cool the bread completely before slicing

~Dee

Pantone Cake | Happy Mother’s Day

My mother always wears red lipstick. I’ve never seen her wear any other color, and it’s almost as if the lipstick is a part of her.
Even as a toddler I remember her wearing red lipstick…
…and I may have also grafftied several walls with those lipsticks….
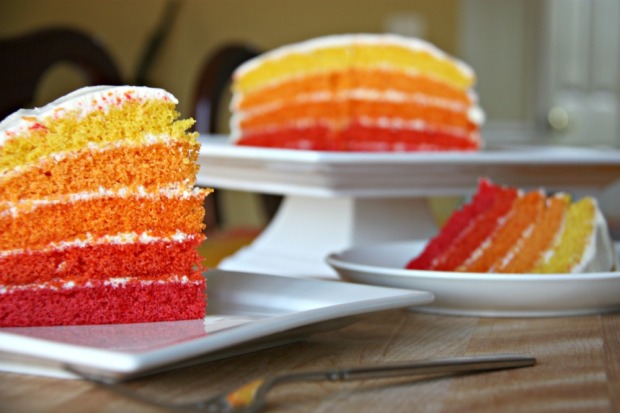
Because of the lipstick, the first color that comes to my mind when I think of my mother is a bright, vibrant red, which is what inspired this cake for her.

My original idea was to have a rainbow cake with six layers, however, I felt that was too  random. I still wanted to do a colorful cake however, so I thought of the various pictures of Pantone swatches I’ve been seeing on pinterest and tumblr lately, deciding to do a red gradient cake. One problem remained: usually when you do a gradient of red, it starts out pink, and pink was not a  color I associated with my mother’s character at all, thus I did a yellow to red gradient instead, which also reminded me of summer, her favorite season.
I had very little time, so by the time the cake layers were baked and ready to use, I didn’t have time to whip up icing, crumb coat the cake, wait for it to dry and then ice the entire thing. Instead I just used a white chocolate glaze on the whole thing,  which I now regret doing because the cake with glaze doesn’t taste as great as cake with icing. However by itself, it was great,with a soft and spongy texture For that reason, I’m only going to include the cake’s recipe, not the glaze, so instead I reccomend pairing the cake with swiss meringue butter cream(for which Kaitlin of Whisk Kid has an amazing step by step guide for).

White Cake 

Adapted from Whisk Kid

  • 2 sticks (226 g) butter, room temp
  • 2 c (426 g) sugar
  • 5 egg whites, room temp
  • 2 teaspoons vanilla
  • 2 1/2 c (426 g) flour
  • 4 tsp baking powder
  • ½ tsp salt
  • 1 1/2 c (355 ml) butter milk at room temperature
  • Red and Yellow food coloring.

Preheat the oven to 350F degrees. Oil and line some 9″ cake pans(however many you have, I only have two so I reused them)
Sift together the flour, baking powder and salt. Set aside.

Cream the sugar and butter, then add the egg whites and add them a little at a time. Add the vanilla and mix until fully incorporated. Then, alternating between wet and dry, add the milk and flour mixture in two parts.

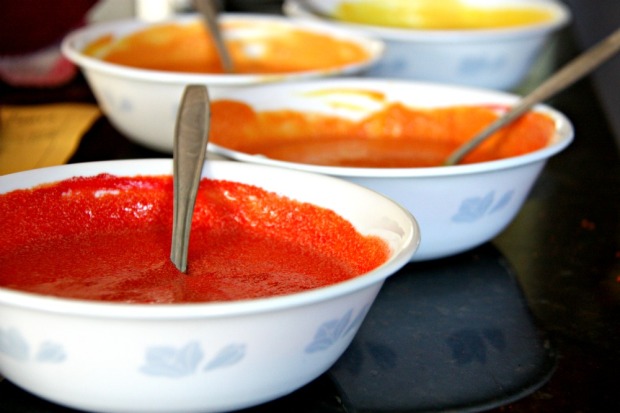
Divide the batter amongst 6 bowls, (i just used my one cup measuring cup, and divided it up  among six bowls, but you can do it by weight as well, just make sure you weight the bowl you’re using before you put anything in it, and then weight it after you’re done preparing the batter, then subtract the weight of the bowl before from the weight of the bowl after, and then divide it by six and put that amount of batter into each bowl).  Next add the food coloring, here are the ratios for it

1st bowl: add as many drops as red food coloring as you want until it looks vibrant enough to you.

2nd bowl: add and yellow food coloring, and keep it to a ratio of 2 red drops to every one red drop(so basically if you ad five yellow drops, then you have to add ten red drops, that way it makes it more of a reddish orange). Don’t start out with ten yellow drops then, have to put in twenty red drops, the mixture will probably be overwhelmed by red, and it won’t look too different from the plain red. Start out with about four yellow drops and add eight yellow drops, until it looks like an orange tinged red to you.

3rd bowl: add red and yellow food coloring in equal amounts to make a regular orange.

4th bowl: add red in yellow food coloring, in the reversed ratio thats in the 2nd bowl, so basically 1 red drop to two yellow drops, to make a lighter more yellowy orange.

5th bowl:  add just yellow food coloring

6th bowl: just leave alone. it’ll be your white layer (  I made a white layer for my cake, however I just ate it plain instead of using it, because I ruined it because i forgot to line the pan before i put it into the oven.)

I’ve only given you the  ratio for the colors because I did this entirely by how it looked to me, and if the color of the batter was vibrant enough, so, keep in mind, that whatever color you see in the batter is exactly the color it will be after it bakes, it won’t darken or lighten or anything.

When you remove them from the oven, let them rest on the cooling rack, in the pan, for ten minutes, then remove it from the pan, and cover it and put it in the fridge to cool quickly, and then frost them with whatever you like.

Tip for frosting: Do a crumb coat, since this is a extremely colorful cake, any stray crumbs from the cake will look really bad if it gets into the icing.

for those who don’t know: a crumb coat is a thin layer of icing that you put on the cake and let it dry so that a layer forms around the cake to prevent crumbs from straying into the whiteness of your icing.

Happy Mothers Day!

~dee

Chocolate Silk Pie

I’ve spent many times in my life sitting down in the dark with my little sister watching movies. Movies fascinate me, with film making stories come to life. I haven’t had time for movies as of late, actually I haven’t had time for anything. However, this weekend, I finally managed to find some time for myself, and sit down to watch The Help. I absolutely loved the movie, it was sweet, had a good amount of laughs in it, along with a good amount of meaning as well. Also, the vintage clothes and the whole setting of the movie was great. One thing that really caught my attention was a chocolate pie that one of the characters, Milly, had made. So, as a result, I decided to make chocolate pie [not the special pie for Hilly(; ].

Chocolate silk pie is a symphony of rich, smooth,  chocolate, with a buttery graham cracker crust to top it all of. I’ve tried this recipe with a traditional pastry pie crust, however  found it to be not as amazing in taste. The filling and the crisp graham cracker crust are a perfect pairing, like peanut butter and jelly. The filling of the pie is perfectly rich,  smooth, and melts in your mouth. It’s absolutely amazing.

French Silk Pie

adapted from Pillsbury

  • 1 Crust (crust recipe below) (you can use a store bought one, or a regular pastry pie crust, but believe me it tastes better with a graham cracker crust)
  • 5 oz. semi sweet chocolate
  • 1 cup room temperature  butter(do not use margarine)
  • 1/2 cup sugar
  • 1/2 tsp vanilla extract
  • 3 eggs(pasteurized)
Graham Cracker Crust
  • 1 1/2 cup of graham crackers
  • 1/4 cup of sugar
  • 1/3 cup of melted butter
1. Prepare the crust by mixing together the sugar and graham crackers in a small bowl, and then adding the butter in, until the butter is evenly distributed. Dump the whole mixture into a 9 inch pie pan and press into the sides and bottom of the pie pan. Bake at 375 degrees F for 8-9 minutes(time may vary a little depending on your oven). Set aside to cool.
2. Melt the chocolate down using a double boiler, and set aside to cool.
3. Beat the butter and sugar until fluffy, and then add the chocolate(which is cool now) and the vanilla extract, until mixed in smoothly.
4. Add one egg in beating until the color lighten and the volume of the mixture increases( about  2 minutes on high speed).
5. repeat step four for the remaining two eggs.
6. pour the mixture into the pie crust(which must be cooled or the mixture will start to melt), and smooth the top over.
7.  Refrigerate for about 2 hours, garnish with whipped cream and whatever else you feel urge to add, and serve :)
Enjoy!
~ Dee :)

Almond Cookies | A Tradition

January has passed by in rushed afternoons, studying as the sun crept down the sky. I missed having time to relax, read, or even to bake. As you can see baking hasn’t quite been in my schedule as of late, and I started to miss spending afternoons stirring up ingredients, feeling the warmth of the oven against my face, and biting into my creations just as they came out of the oven. Finally after weekends of studying relentlessly, I finally found myself an hour of time.

With this extra time, I made these familiar little cookies. I grew up with them, watching my mother bake them at nearly every special occasion, however I never quite liked them, or appreciated them. Soon, my family’s life became a lot busier, and my mother stopped baking the cookies for a while and the tradition was forgotten.

But only for a while.

A couple of months ago, in December I had to complete a school project about my family’s traditions, and the very first thing I thought of were these little cookies. I did not have much time that particular weekend, and my mom was more familiar with the recipe, so I asked her to make them for me. When I finally bit into one I realized how much I had missed my mother’s cookies, and remade them for my family.

Almond Cookies

  • 16 tablespoons butter at room temperature (I used browned butter, but that’s purely optional)
  • 2/3 cup brown sugar
  • 1 egg yolk
  • 1 1/2 teaspoon vanilla extract
  • 2 tablespoons vegetable oil
  • 2 1/2 cup flour
  • 1 teaspoon baking powder
  • 1/2 teaspoon baking soda
  • 1/4 teaspoon salt
  • 1/2 cup of ground almonds
  1. Toast the almonds until golden brown.
  2. Sift together the flour, baking powder, baking soda, and salt.
  3. In a separate bowl, cream the butter and the brown sugar together until fluffy, then add in the egg yolk, oil and vanilla, and mix well.
  4. Add a half a cup of flour mixture to the butter mixture and mix in well.
  5. Repeat step three until all of the flour mixture is mixed in.
  6. Add the almonds to the mixture, and mix in well. Scoop 1/2 a table-spoon for each cookie and roll them into a ball and space them out on a cookie sheet evenly.
  7. bake at 350 degrees farenheit for 20-25 minutes or until golden brown.

Christmas | Red Velvet

Christmas is one of those seasons that has a contagious mood, and it makes everyone want to be happy. The lights, the colors, and the happiness of the season is amazing.

My family isn’t Christian, but since we’ve been in America  for so long, we’ve taken on some of the traditions, and added many of our own.

The week before Christmas when I was four I  saw a red velvet cake for the first time. This may sound strange,  but in my little four year old head there were only to types of cupcakes: chocolate and vanilla, and chocolate was the better one.  When I saw this red velvet cupcake, frankly: it blew my mind, I was amazed, and immediately obsessed. So for that Christmas, a new tradition started: we would have red velvet cake for a snack on Christmas along with our tea. A strange tradition, yes, but it’s something I just love and look forward to every year.

The tradition has altered a little, now instead of just having cake, my sister decided that cupcakes were I quote: In style, and definitely cuter. Admittedly, I don’t like red velvet cake as much as I used to, the cake part’s flavor isn’t all that amazing. However my mother and sister are great fans, and I still remain a fan of cream cheese icing on the cake, so the tradition remains.

Red Velvet Cupcakes

From Confetti Cakes Cookbook, via Smitten Kitchen

  • 3 1/2 cups cake flour
  • 1 1/2 teaspoons salt
  • 1 ½ cup canola oil
  • 2 cups granulated sugar
  • 3/4 cup of melted and slightly cooled semi sweet chocolate
  • 3 large eggs
  • At least five table spoons of food coloring (this can be increased or decreased by the red color you want, since this recipe has a good amount of chocolate in it, it takes a whole lot more coloring to make it red and same goes for any other colors you feel the urge to try out)
  • 1 1/2 teaspoons vanilla
  • 1 ¾ cup buttermilk
  • 2 teaspoons baking soda & 2 1/2 teaspoons white vinegar mixed together
  1. Preheat oven to 350 and line cupcake tray with liners.
  2. Whisk together the cake flour and salt in a medium sized bowl.
  3. Mix together the canola oil, sugar, the chocolate and the eggs( don’t put the chocolate in immediately after heating it! Let it cool down a little, other wise it can scramble the eggs) in a large bowl until smooth.
  4. Add the food coloring
  5. Add the butter milk and the flour alternately to the oil/egg/sugar/chocolate bowl, and mix to smoothness, then add the vinegar/baking soda mixture…
  6. fill the cupcake trays
  7. bake for about 25 minutes(i reccomend letting it bake fifteen minutes, then coming back and checking, every five or six minutes after), until you are able to put a tooth pick in it, and pull it out cleanly.

The Icing.

  • 8 ounces cream cheese, room temperature
  • 1/2 cup (1 stick) butter room temperature (you need it at room temperature, other it won’t blend smoothly)
  • 3 cups confectioner’s sugar, sifted  ( you may need more if you want a stiffer icing, in these pictures i used 4 1/2 cups)
  • 1 teaspoon pure vanilla extract
  • 1/2 teaspoon espresso (optional, i just find that it adds something extra to the whole cupcake)
  1. Mix together cream cheese, butter, vanilla extract, and espresso.
  2. add cup, by cup of sugar and beat it, till fluffy and light. (mixers make it easier)
Note:  When frosting this, note that cream cheese frosting can be a little heavy, which is why i piped the icing on the pictures above a little flatter than i normally would.

Enjoy, and happy holidays!

Vanilla Sugar

A couple days ago I was sitting in my biology class, listening to my teacher talk about evolution, the past of earth, and fossils. Fossils were a subject that have fascinated me ever since I was a child, it amazed me how an animals body could turn into stone, however I never quite looked into it, intimidated and confused by the complex terms I didn’t understand, being the age of seven(even though I did try making my own fossils). However, when I grew older, I switched on to a different scientific fascination, forgetting about fossils until now. I’ve finally found out how fossils become the way they are, and the strange thing is, when I was reading about this, it reminded me vaguely of vanilla sugar. No, I don’t always relate everything I learn to baking, however this was one time I did :)

So with fossils what happens after its buried is that the minerals in the bones of the organism and other hard tissues get replaced with metal ions and other inorganic materials, and also combined with the pressure of the sediment on top of the whole thing transforms it.

With vanilla sugar you have two simple elements, sugar and a vanilla bean, with the insides scraped out. Now you leave them in an air tight jar for a while. The sugar starts to take on the smells and tastes of vanilla like the bones did with the metal ions and inorganic material. However in the end, unlike the process of fossilization, you end up with a delicious vanilla tinged sugar that adds a little flair to everything you put it in.

So, you ask, what exactly is vanilla sugar, and what do we do with it?

Well that’s simple. It’s simply sugar that  has this amazing vanilla taste to it, and you can do many things with it, like spoon a bit into your tea, or coffee in the morning, however I mostly prefer using it for making creme brulee, trust me it makes a difference compared to regular granulated sugar!

So I’ll start over from the beginning for how to make it.

you need:

A vanilla beans with the insides scraped out or used(i usually use mine in ice cream, and keep the pods around for exactly this purpose).

An airtight jar | I usually make really big jar of this but for depiction purposes:

and lastly: sugar. Just plain ol’ granulated sugar.

so what do you do with these?

  1. Take the jar and fill it up with sugar(not fully to the rim. Just below is good.)
  2. Take your vanilla bean, and push it into the middle of the sugar, like so:

3. Put it in the pantry wait for a month. Yes a month. Although I recommend checking on it every week and a half, because I’ve heard other food blogs say that their vanilla sugar was made much faster than mine. How do you know its ready? You open the jar, and the first you smell is the light aroma of vanilla, and if you taste the sugar it should definitely taste vanilla-y.

Bon apetit :)

~Dee D.

Strawberry Tart | Me

Dear Readers,

I’m sorry I haven’t been around…

I’ve been caught up in some of my business(which involved staring at textbooks and math equations relentlessly)…

If you’re a new reader, hello and welcome :)
Hope are enjoying it :)

This is going not going to be one of my usual posts, it’s going to be somewhat more quick and direct because at the moment I am busy, and I just wanted to post something quickly…

Also, some of you commented and emailed me for step by step pictures of each of posts, and here’s why I don’t want to do this:

I have nobody around most of the time to take pictures for me, so I’ll have to take them myself. No it’s not because I’m lazy, it’s because I will get involved in what I’m making and forget to take pictures, so you’ll probably end up with half of the pictures for all the steps…

I will try however :)

I know I’ve said this before, but just in case you don’t know: if some of you have questions about anything, feel free to email me, or just leave a comment below, and I’ll reply to your email and/or comment! My email is: thenexperiments@live.com. If you want to tweet me as well, go ahead! My username is @thenexperiments (there’s also a follow button on the side somewhere).

Now about this tart I’m supposed to be talking about… I’ve had this recipe, and these pictures for a while now, except I never got around to posting, and I forgot about it, until now when I realized it was strawberry season, and this would be perfect for use!

I really love this tart. Its crust is amazing, and ridiculously flaky and buttery. The pastry cream, isn’t fully solid but it ta

stes great, and it uses a only a little of heavy cream(I’m really attempting to find recipes for things without heavy cream, its notoriously bad for you! How ever I am being a little hypocritical, considering the tart shell, but I cannot not use that shell! its amazing!)…and the topping of the fresh

strawberries really just is great :) It adds a fresh taste to it :)

Hope you try and enjoy it!

Fresh Strawberry Tart

  • 1 pack of strawberries(16 oz.) quartered.
  • tart shell(recipe below)
  • pastry cream (recipe below)

Use this recipe from David Lebovitz for the tart I followed the whole thing exactly, and he has pictures of certain steps as well :)

Pastry Cream

Modified from Barefoot Contessa in Paris via Culinate

  • 5 large egg yolks at room temperature
  • 3/4 a cup sugar(I didn’t fully fill each of the cups to minimize the sugar content in this  somewhat)
  • 3 tbsp. corn starch
  • 1 1/2 cups of scalded milk(scald the milk by heating it at a medium, until it develops a skin on top and that skin starts to rise and turn off the heat before the whole thing boils over. note: scald this right before you start the first step of this)
  • 3/4 tsp. pure vanilla extract.
  • 1 tsp. rum
  • 1 tbsp.unsalted butter
  • tbsp. heavy cream
  1. Whip up the eggs and sugar, until it become a very pale, almost white-ish yellow and the mixture will be very thick.
  2. If you are using a mixer, lower the speed of the mixer and add in the corn starch. if you are doing this by hand, simply mix in the cornstarch.
  3. Then while constantly mixing pour the scalded milk into the egg yolk and sugar mixture. Don’t stop mixing, or the eggs may scramble.
  4. Pour all of this, in to a medium pan, and put it on medium heat stirring with a whisk.
  5. After a while this will start to look at though it is curdling, so at this point start stirring vigorously with the whisk.
  6. after a while it will come together a little bit more and that is when you put in the rum, vanilla extract, butter, and heavy cream. Stir it in and continue to cook for a minute, then remove from heat.
  7. Grab a strainer, and put it over a a bowl and strain the mixture.
  8. Cover the bowl of the mixture, and put it in the refrigerator until it is cool.
To assemble tart:
  1. make sure pastry cream, and the tart shell are cooled down completely.
  2. pour the pastry cream into the tart shell. Be careful, the tart shell is a little delicate, and spread it out evenly.
  3. top the whole thing with the strawberries, you can simply toss them on there, or arrange them like I did, what ever you like.
Note: this recipe for this tart can be pretty flexible.
So you say you want lime and coconut tart? Add approximately a teaspoon(taste and adjust) into the pastry cream, and a half cup of coconut, and top the whole thing with shredded coconut.
Or if you want a black forest gateaux inspired one, cut up some maraschino cherries, and mix them into the pastry cream, and replace some of the flour inthe tart dough with chocolate powder, and cover it all with a chocolate glaze perhaphs.
Be creative, and if you have any questions email me.

Hope you enjoy!

Blondies | Hello Spring

I love spring, its one of the most beautiful seasons, with birds coming out of hibernation, flowers blooming, and the very best part: more sunlight.

The lack of sunlight is one of the biggest reasons I despise winter. The sun used to set at five everyday, and even then it was so drab and depressing because the sun almost never came out from the clouds…but now a five, the sun is still out shedding its vibrant rays of sunshine upon us.

I would say flowers are my very favorite part, however I have ridiculous pollen allergies…although I’m not experiencing  the allergies that badly this year, the occasional sneezing fits…well they’re not fun.

I remember back in first grade where they used to be truly horrible, that one day in class my teacher took pity on me, and let me be teacher for half a day, because she felt bad for me. She even colored my project in for me. I loved that day, and i still do :)

But even with that I still think spring is wonderful. And to celebrate I baked some of my favorite baked goods: Blondies.

I really love blondies. In fact I love them more than brownies!

Just because I’ve encountered a lot of confusion when I’ve mentioned blondies, I ‘ll explain what they are: Like chocolate cake is the opposite to vanilla cake, the opposite to brownies, are blondies! Where brownies depend upon chocolate to flavor it, blondies depend on butterscotch like flavor. Both have the same density(between a cake and fudge), its simply their flavoring that differentiates them.

They are amazing, so buttery and lighter in taste than brownies, which are rich and somewhat heavy tasting.

Blondies

Adapted from Whipped 

  • 1 c. unbleached all-purpose flour
  • 1 tsp. baking powder
  • 1/4 tsp salt
  • 1/2 c. & 2 tablespoons unsalted butter
  • 1 c. brown sugar
  • 1 large egg
  • 1 tsp. vanilla extract
  • any extra toppings that you want such as nuts or chocolate chips and such.
  1. Preheat oven to 350 degrees farenheit.
  2. Line an 8 inch baking pan with baking parchment, or aluminum foil.
  3. Sift together flour baking powder and salt into small bowl. Set aside.
  4. In a medium saucepan melt the butter down, and cook until it starts looking brown and smells nutty.
  5. Add the brown sugar, and continue to cook until this darkens slightlfy, smells like butterscotch and the sugar is fully melted down. *If the sugar for some reason isn’t melting, which has happened to me sometimes, remove it from heat and put it in a medium sized bowl letting it cool for two minutes, then add in the eggwhisking the whole time. If you stop whisking the eggs will scramble. If the sugar starts chunking up its okay! Mix as much as you can until the bottom of the bowl feels very mildly warm to the touch, then grab a sieve, and drain the what ever liquid-y parts you have in to a small bowl and reserve that. Grab your food processor, and put the chunky sugar parts in the sieve into the food processor and blend until it is no longer chunky, then put this back in the medium sized bowl that you started with, and add that liquid part that you had reserved. Stir in the vanilla.* How ever if your sugar did properly melt down, remove it from heat, stir it a little with a wooden spoon until cool down a little for approx 4 mins. Then add in the eggs and the vanilla mixing constantly.
  6. Stir in the flour mixture, and any additional toppings that you chose, spoon the batter into the baking pan, and spread it evenly.
  7. Bake until the center of the batter seems set(approx 20-25 mins)
  8. After taking it out, let it cool completely, then remove the baking parchment or aluminum foil, cut and enjoy! :)

~Dee D.

Sweet Potato Fries.

I like simple recipes. The recipe always seems to be simple but the flavor of dish that results is always complex.

Take for example these sweet potato fries. They simple to make. Chop the potatoes, drizzle a bit of olive oil, sprinkle some garlic powder, smoked paprika, salt and pepper, then bake till crisp.

Its just that simple.

The result? A fry with a crisp, spicy salty outside, with a slightly sweet, soft inside.

These are honestly my favorite fries. I like these better than regular fries. Not only do they have a better flavor, they’re also much healthier than  regular potato fries.

Try them :) You’ll love them too :)

Sweet Potato Fries

  • 2 medium sized potatoes
  • 1-2 tbs. olive oil
  • 1 tsp. garlic powder
  • A sprinkle of pepper(adjust to your tastes, i usually use 1/3 tsp)
  • 1/3 tsp. salt
  • 1/2 tsp. smoked paprika

1. Turn on the broiler, or preheat the oven to 450 degrees. I usually use the broiler. I find that it gets a some what crisper with the broiler, but the oven works too.

2. Cut up the the sweet potato into french fry like slices and toss it into a bowl with a lid(it doesn’t matter if you have the skins on or not, its all your choice, sometimes I leave them on other times I don’t)

3. Drizzle the olive oil over the potatoes and sprinkle all the spices over it all.

4. Put the lid on the bowl and toss the potatoes around until they are fully coated in olive oil and spice.

4. Put them in the oven from 10-15 minutes or until the ends of some fries start to get blackened.

Notes: This is one of the recipes which are extremely customizable. Add what you like, change something and personalize it. My sweet potatoes are never truly consistent. Every time I add, or take out something from this mix that i have up there.

~Dee D.